Introduction:
Queen's has an on-campus observatory which is used for open houses. Because there is no CCD (charge-coupled device) camera currently on the Queen's telescope, it cannot be used for projects. Regular free open houses occur at the observatory to which all students are invited. Please see The Queen's Observatory for more information.
For the project itself, you will be using the iTelescope network of robotic telescopes. This year, students will work in pairs to obtain their data only, but will do their own analysis and write their own report. See Queen's academic integrity page for more information. Instructions regarding the two parts of the Phy 315 project, PART A and PART B, can be found below. Zsolt Keszthelyi is the TA for the course and can assist with the observing project. Zsolt should first be contacted by email at [email protected] if needed and he will also maintain an office hour on Thursdays from 1:30 to 2:30 p.m. in room 358 Stirling Hall.
THE OBSERVING PERIOD WILL BE SEPTEMBER 24 THROUGH OCTOBER 6, 2018
Research:
This year's research is focussed on the planet, Neptune, and its largest moon, Triton. Neptune is well-placed for observations this Fall, being close to opposition in the sky. We will do a very classical experiment, namely to track the orbit of Triton around Neptune and (knowing the distance) estimate the mass of Neptune using Kepler's Third Law. A mathematical description of this law is given in Equation 7.5 of the textbook. In addition, we will track the motion of Neptune with respect to the background stars.
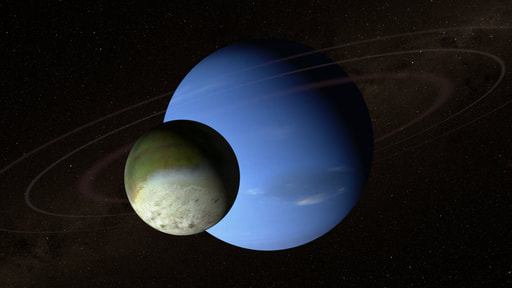
A useful link for information about Neptune is TheSky Live . The mass of Neptune is, in fact, well-known. Under no circumstances are students to 'fudge' their results. Carry out this experiment as if you do not know! Also, ensure that good error estimates are made and carried through to the final result. Below is an artist's conception of Neptune and Triton.
A useful link for information about Neptune is TheSky Live . The mass of Neptune is, in fact, well-known. Under no circumstances are students to 'fudge' their results. Carry out this experiment as if you do not know! Also, ensure that good error estimates are made and carried through to the final result. Below is an artist's conception of Neptune and Triton.
Specific Goals:
The goals are a) to familiarize the students with modern techniques in astronomical observations and software, and the care and commitment required to obtain good data, b) to identify Neptune in a field of stars and track its motion, c) to understand what steps are required for data calibration, d) to track the motion of Triton around Neptune, and e) to estimate the mass of Neptune, including properly propagated errors.
PART A: Observational setup
Planetarium Software:
If you do not already have planetarium software on your computer, the first step is to download and install this aid. Stellarium is free software which has linux, mac, and windows versions. Spend a little time exploring this software. It will help you to see the location in the sky of the planet (or any other object), when it rises and sets at a given location, how high it gets in the sky, whether it is too close to the moon to be easily observed, etc. Learn how to set your location and time, especially, as well as how to search for specific objects.
The iTelescope Network:
The iTelescope network is an international network of amateur telescopes that are available to the public 'for hire'. The Dept. of Physics, Engineering Physics, and Astronomy has bought points on this system so that students can use the telescopes without charge. On the website, explore the telescope options by clicking on the 'telescope' tab at the top. There are telescopes in Spain (not on-line when I checked in August), Australia, New Mexico and California. Neptune will be visible from all locations. Choose a telescope -- I recommend a medium-deep or a deep space telescope so that Triton will be easily visible. Try not to choose a 'wide-field' telescope because the pixel resolution will likely be too crude. Once you have chosen a telescope, it's best to use the same one for all of your observations. This isn't absolutely necessary but will make things a bit simpler because the scale on the CCD will always be the same and so will the necessary exposures. Ensure that you make a note of the telescope's technical specifications, especially the Long/Lat of the observing site, the field of view (FOV) and the scale, i.e. the number of arcseconds/pixel.
You will be given a username and login by the TA. Log in and go through the video tutorials so as to understand the system and learn how to set up a reservation and an observing plan.
You will be given a username and login by the TA. Log in and go through the video tutorials so as to understand the system and learn how to set up a reservation and an observing plan.
Set up the observations:
When you log in, you will log in twice: once to access the iTelescope network, and then once again to log in to the specific telescope that you have chosen. You can now see what reservations have already been made by others. Make sure that you know the rise and set times for Neptune from this observing site. This can be done in Stellarium by setting your 'location' to be the location of the telescope and adjusting the time as needed. Warning! Times at the telescope (iTelescope) are local times (i.e. the time as if you are physically at the telescope). Check how Stellarium understands the times (e.g. standard, daylight).
Now make a reservation for 15 minutes each upcoming night. You will want to make one 15 minute observation each night for 12 successive nights, but iTelescope will only allow you to do this for the next 4 nights. This means that you'll have to repeat the process of making reservations several times. Also, each individual observation does not actually need 15 minutes (see below) but the reservation system requires this as a minimum. You are competing with other people for time so its best to make your reservations without delay.
Next go to the Plan Generator and set up your observing plan (give it a name, (e.g. Neptune_John.txt) Use the V filter (no binning) and take a sequence of 1 x 30 seconds, 1 x 60 seconds, 1 x 180 seconds images -- and then repeat the above -- and save your plan. Then go back and edit your reservations so that they access the name of your plan. Notice that these times add up to only 9 minutes which is less than 15 minute minimum. Thus, there will be some time left over; however, the telescope runs through some calibrations and must slew to the source at the beginning from wherever it is pointing previously so it's good to have some slop.
The reason for trying some different exposure times is so that you obtain the best image you can. If your counts are too low, then the signal-to-noise level is poor and your errors are higher. However, there is also a maximum number of counts possible; if the counts reach 65535, then that pixel (or pixels) have reached the saturation value value. Any object that has reached this value is overexposed and cannot be used to determine a V magnitude. Experience has shown that Neptune itself may very well have reached this value for the exposure times suggested above, so we will not be calculating V magnitudes in this project. The reason for duplicating the set of observations is that sometimes (though I have found rarely) the observation might fail for some technical reason. If you end up with, say, two good observations at 60 s, or two good observations at 180 (say), then you will have more data for your measurements later and consequently more confidence in the results.
Check that the observing has been successful as you go along:
You will receive an email as to whether the observing has successfully been carried out each night. Remember, these are REAL telescopes obtaining data in real time. It *could* be cloudy!
Download your data (blue 'Download my data' tab on the home page after the first login, OR, click on the link that you will be sent after any successful observation). After unzipping, the files you want will start with 'Calibrated'. Make sure that you know what this means!! The calibrated images have already been corrected for bias, flat fielding and thermal counts. I expect a paragraph explaining what each of these corrections do in the final write-up.
The files are in 'fits' format. Fits stands for 'flexible image transport system' and is the standard for almost all research-based astronomical observations and many amateur images as well. The file starts with a 'header' which is just text and can be read normally. The header contains a plethora of information about the observations, including the exposure time, the UT date of the observation, what filter was used, the latitude and longitude of the site, the object name, name of the observer, information about the calibration, etc. Following the readable header is a binary file, so if you keep trying to read the file, you will see only gibberish.
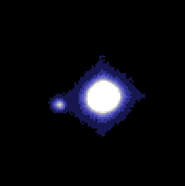
To check your fits files, you will need fits-reading software (see below). Although jpegs are sent to you by email along with your notification of a successful observation, the stretch (i.e. the numerical scale) may not be ideal for you to see both the planet and its moon. I provide an example as to what you might see in the following picture that I made from the fits file after zooming in on Neptune. The image was taken using the T24 telescope in a 60 second exposure on August 19, 2018. Depending on how you set your stretch and field of view, background stars should also be visible across the field. For this image, I just wanted a quick look program so I used 'xv'. There are a variety of fits readers available. Options for data reduction include Siril, DS9, or IRIS (to be clarified by the TA, see Part B). At this stage, you just want to see that things have worked and that Triton, whose position can be seen to change day-by-day, is happily orbiting Neptune. I have almost always found that the iTelescope network telescopes center the source of interest very nicely, exceptions being if something has occasionally slipped at the telescope. In this picture, Triton is clearly seen just to the east (left) of Neptune.
Download your data (blue 'Download my data' tab on the home page after the first login, OR, click on the link that you will be sent after any successful observation). After unzipping, the files you want will start with 'Calibrated'. Make sure that you know what this means!! The calibrated images have already been corrected for bias, flat fielding and thermal counts. I expect a paragraph explaining what each of these corrections do in the final write-up.
The files are in 'fits' format. Fits stands for 'flexible image transport system' and is the standard for almost all research-based astronomical observations and many amateur images as well. The file starts with a 'header' which is just text and can be read normally. The header contains a plethora of information about the observations, including the exposure time, the UT date of the observation, what filter was used, the latitude and longitude of the site, the object name, name of the observer, information about the calibration, etc. Following the readable header is a binary file, so if you keep trying to read the file, you will see only gibberish.
To check your fits files, you will need fits-reading software (see below). Although jpegs are sent to you by email along with your notification of a successful observation, the stretch (i.e. the numerical scale) may not be ideal for you to see both the planet and its moon. I provide an example as to what you might see in the following picture that I made from the fits file after zooming in on Neptune. The image was taken using the T24 telescope in a 60 second exposure on August 19, 2018. Depending on how you set your stretch and field of view, background stars should also be visible across the field. For this image, I just wanted a quick look program so I used 'xv'. There are a variety of fits readers available. Options for data reduction include Siril, DS9, or IRIS (to be clarified by the TA, see Part B). At this stage, you just want to see that things have worked and that Triton, whose position can be seen to change day-by-day, is happily orbiting Neptune. I have almost always found that the iTelescope network telescopes center the source of interest very nicely, exceptions being if something has occasionally slipped at the telescope. In this picture, Triton is clearly seen just to the east (left) of Neptune.
Submit a Progress Report: Due Monday, Oct. 15, 2018
The progress report should contain one image that clearly shows Neptune and Triton. It should contain a table of information indicating what observations have been obtained, e.g. date, duration, filter, etc. Specify which telescope was used, its site, latitude and longitude, telescope aperture and CCD information such as field of view and scale. Include any other information that may be pertinent, such as the relative location of the moon and whether the observations failed because of weather. Please be specific. If you indeed have had failed observations, then the information (date, telescope, etc) should be in your table alongside the good observations, but with a flag indicating that they failed and why. The progress report should be no more than 2 pages.
The progress report is worth 5% -- that is, 5 marks out of the 25 total marks for the project are allocated to this report.
Observing is taken very seriously by astronomers. Without time and attention paid to careful data collection, we would know nothing about the universe we live in.
The progress report is worth 5% -- that is, 5 marks out of the 25 total marks for the project are allocated to this report.
Observing is taken very seriously by astronomers. Without time and attention paid to careful data collection, we would know nothing about the universe we live in.
Part B: Reduce and Analyze the Data
This part of the project requires that you make measurements from the images.
The TA for the course will provide a tutorial as to how to carry out the data reductions and determine the remaining part of the project on Wednesday, October 17 in class. Further information will be provided at a later date as to what is expected in the final report.
Final Report is due Monday, Nov. 26, 2018
Please write up the final report as you would a lab, but this project is more in-depth than a laboratory report would be. The sections would therefore be: abstract, introduction, observing data and analysis, results, discussion, and conclusions. Here is an example but there are many more at the ADS service.
Introduction: Do some reading about Neptune and Triton. Introduce some known information and provide references.
Observing data and analysis: This should contain all of your data in tabular form (i.e. what you submitted for the progress report), as well as all the steps that you went through to reduce/measure the data. Be quantitative and be clear about the steps, even those that you didn't do yourself (e.g. what were the calibration steps that happened before you downloaded the data). Were there any issues that caused problems? Specify. Include error analysis. Indicate the name of your partner. The data analysis and write-up are your own! Do not share anything beyond the collection of the data.
Results: What did you find? Re-read the objectives.
Discussion: Discuss the results. Does your mass of Neptune agree with the known value or not? Does the motion of Neptune through the background stellar field agree with the known motion or not? Agreement means that the error bars on your value overlap with the known value. Do not artificially increase your error bars to get agreement! If they do not agree, offer a believable reason. What is your overall assessment of what you accomplished for this project? Can you suggest ways in which what you have done could be improved?
Conclusion: Should be fairly obvious what to write here.
N.B. I will not accept late projects!!!